Beauty Portrait Retouch Guide
Do you want beauty portraits that actually look expensive, not cheap and over-smoothed
Do you want AI portraits that keep skin texture, respect makeup, and still look flawless under any light
Do you want a clear guide that tells you exactly what to enhance and what to leave alone
AI photo generation can create strong beauty portraits. But raw AI output is rarely ready to use. Faces look plastic, eyes glow like LEDs, makeup turns into flat color blocks, hair becomes a mess, and lighting destroys skin tone. Real power comes when you control the retouching stage. That is where you turn “AI-looking” faces into premium beauty images that pass as pro studio work.
This guide explains how to retouch AI-generated beauty portraits in a way that works in the real world. It shows you what to push, what to soften, and what to never touch. You will learn how to handle heavy makeup, bare skin, bad lighting, uneven light, hair chaos, and high-contrast backgrounds. Every section focuses on one type of beauty portrait and how to make it look clean, sharp, and high-value fast.
Use this as a practical workflow. Pick the portrait type that matches your AI image. Apply the methods. Keep your changes strong but controlled. Your goal is simple. Skin with texture. Eyes with life. Makeup that looks intentional. And a final image that looks like it came from a real beauty campaign, not a random AI generator.
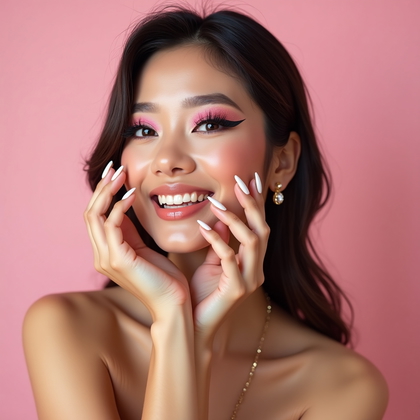
Full Glam Beauty Portrait: How To Make Heavy Makeup Look Expensive
Full glam beauty portraits live or die on edges and color control. Heavy eyeshadow, hard contour lines, strong lipstick, and sharp brows all demand clean, precise retouch. The worst thing you can do here is blur everything. That kills the makeup artist’s work, even if the artist is virtual. You must protect detail while fixing the mess.
Focus first on edges around the eyes, lips, and brows. Remove color fallout under the eyes. Clean mascara clumps if they look messy, but keep individual lashes sharp. Strengthen the eyeliner edge instead of softening it. Deepen the crease color of the eyeshadow if it looks washed out and add saturation only to the makeup, not the skin. On the lips, sharpen the outline, remove jagged AI artifacts, and even out color, but never erase natural lip lines completely. Skin can be smoothed, but only on large areas like cheeks and forehead. Keep pores, smile lines, and subtle texture visible so the face does not look like plastic.


Click on a photo to try your face in it
Bare-Faced Portrait: Clean, Honest Skin Without Fake Plastic Smoothing
Bare-faced portraits expose every flaw and every strength. You cannot hide behind strong makeup, so every retouch step is more visible. The goal here is not perfection. The goal is believable, clean skin that still looks like real skin. For AI images, this means undoing the fake waxy texture that many models produce and building a gentle, natural glow.
Start by balancing color. Fix redness around the nose, mouth, and chin. Tone down blue or purple shadows under the eyes, but do not erase the under-eye shape. Keep natural skin variation across cheeks and forehead. Remove only the most distracting blemishes or texture glitches. Do not remove moles, natural freckles, or all fine lines unless you want a totally unrealistic look. Add a soft highlight on the high points of the face: top of cheekbones, bridge of nose, Cupid’s bow, and a tiny touch on the chin. Keep sharpening light, and do not brighten eyes or teeth too much, or they will look fake next to subtle skin.


 ensures the focus remains squarely on natural skin and facial detail, making this scene a sophisticated example of minimalist, bare-faced beauty portraiture.")
Click on a photo to make this moment yours
Color-Cast Beauty Portrait: Fix Bad Lighting Without Killing the Mood
Color casts are brutal on skin. Mixed warm and cool light can turn faces orange, green, or grey. AI often exaggerates this, especially under neon, sunset, or indoor lighting. The key is to correct the skin without flattening the image into boring neutral light. You want nice skin tones and still keep the scene’s character.
First, decide what must look clean. Skin, teeth, and eye whites should always be under control. Backgrounds and clothes can keep more color cast. Gently neutralize green, magenta, or heavy yellow in the skin using hue and selective adjustments, not global white balance alone. Keep subtle warmth in midtones if the scene is warm, or slight coolness if it is meant to be moody. Fix teeth and eyes last. Do not push them pure white. Aim for soft, slightly warm whites so they match the corrected skin. Keep contrast moderate. Strong contrast with heavy color cast often looks cheap and artificial.


Click on a photo to make it real with your face
Eye-Focused Beauty Shot: Sharp, Bright, Alive Eyes Without Alien Glow
Eye-focused portraits are unforgiving. The viewer sees every detail in the iris, lashes, and brows. AI often makes eyes too bright, too sharp, or too symmetrical, which can look creepy. Your mission is to control intensity. You want eyes that are sharp, clear, and luminous, but still human.
Sharpen only the iris texture and lash lines. Do not over-sharpen skin around the eyes, or every pore and wrinkle will jump out. Brighten the iris slightly, but never blow out highlights. Deepen the limbal ring (the dark ring around the iris) just a little to add depth. Clean the eye whites, but keep light blue, grey, or tiny red veins. Total pure white eyes look like plastic. Fix brows by filling gaps, tidying shape, and smoothing AI glitches in the hair pattern. Keep micro-hairs visible so the brow does not look like a flat stamp. Lower overall saturation a bit if the eye color looks too neon.


Click on a photo to transform it with your face
High-Contrast Makeup: Clean Edges Against Dark or Light Backgrounds
High-contrast beauty portraits expose every mistake along the edges of the face and hair. When the subject has dark hair or deep makeup against a very bright or very dark background, any halo, blur, or rough outline destroys the quality. AI loves to create glowing outlines and messy cutouts. You must fix that.
Zoom in on all transitions: hairline against background, chin and jaw edges, shoulder lines, and anywhere dark lipstick or dark eyeshadow meets skin. Remove white halos, color bleed, or jagged pixels. Clean the silhouette without over-smoothing into a hard plastic edge. Use subtle feathering, not harsh erasing. On the makeup itself, deepen blacks and rich colors inside the shape, not at the outer rim. This keeps edges sharp but still natural. If the background is very bright, keep a tiny soft shadow at the subject edge for realism. If the background is very dark, do not crush shadows so much that the hair disappears into a black block.


Click to create your version
Editorial Beauty Portrait: Strong Pose, Strong Expression, Controlled Polish
Editorial beauty portraits are driven by pose and expression first. The face may be tilted, stretched, or partially hidden. Lighting may be dramatic and not “perfect.” Your retouching must support the concept, not fight it. Clean and enhance what matters, but do not neutralize the drama that gives the portrait power.
Start by reading the expression. If it is intense, keep stronger texture and contrast around eyes, brows, and mouth. If it is soft or dreamy, ease contrast and keep transitions smooth. Fix skin inconsistencies that distract from the pose: random artifacts, weird AI lines, or patchy areas. Do not flatten sculpted shadows that shape the bone structure. Enhance shapes that support the pose, like jawline, cheekbone, or neck lines, but avoid over-contouring. If limbs, hands, or shoulders are visible, correct odd distortions first. Slightly sharpen important features like eyes and lips, then reduce detail in less important areas so the viewer looks where you want.


Click on any photo to make it yours
Uneven Lighting Portrait: Repair Harsh Light Without Killing Depth
Uneven lighting, with one side of the face bright and the other dark, can create strong mood or total chaos. AI can push this too far, giving burned highlights and empty shadows. You must control exposure differences while keeping real three-dimensional depth. Flat faces look cheap and fake.
Work on highlight and shadow regions separately. Recover lost detail in bright areas like forehead, cheekbones, or nose tip. Bring back some texture so the skin does not look like a white plate. Lift shadows gently to show structure on the dark side of the face but do not match both sides completely. Keep at least one to two stops of difference so the light still looks directional. Pay attention to under-eye areas and nasolabial folds where harsh light creates deep cuts. Soften only the hardest transitions there. Maintain contrast in the eyes and lips so the face remains the focal point, not the bright patch of forehead or cheek.


Click on any photo to make it yours
Beauty Portrait with Flyaway Hair: Clean Face Without Plastic Smear
Flyaway hair and stray hairs on the face are a nightmare for AI and for retouch. Many tools just blur them away, leaving dirty smudge marks and fake smooth skin. If you want high-end beauty, you must treat hair carefully. Remove what distracts, keep what looks natural, and never erase texture under hair.
First, decide what must go. Long, bright hairs crossing eyes, mouth, or key areas of skin should be removed. Hairs on the forehead or cheeks that look like random scribbles from the AI also need to go. Use tools that clone or heal along skin texture, not across it. Keep pore structure, light gradients, and fine tonal changes. For hairline areas, clean only the wildest flyaways. Leave some small stray hairs so the hairline looks natural, not like a sharp wig. If hair crosses background, you can soften and thin it instead of removing it completely, so edges do not look harsh or obviously altered.


Click on any photo to add your face
Conclusion: Turn AI Faces Into Serious Beauty Images
AI can generate endless faces, but raw AI is not enough if you want real beauty portraits that hold up under close inspection. The difference comes from targeted retouching that respects structure, texture, and design. Heavy makeup needs sharp edges and clean color. Bare skin needs subtle correction and a gentle glow. Bad lighting and color casts need smart balance, not total neutrality. Eyes must be sharp and alive, not neon. High-contrast scenes need clean edges. Editorial looks need polish without losing style. Uneven light must be controlled, not flattened. Flyaway hair must be cleaned with patience, not blurred away.
If you apply these methods to your AI portraits, you get images that look deliberate and professional. You remove what is distracting and keep what gives the face character. You learn to push AI output where it is weak and protect it where it is already strong. This is how you move from generic AI faces to powerful, convincing beauty portraits that you can actually use in portfolios, campaigns, and personal projects with confidence.